Saturday, March 31, 2012

Contents

Eclipse :

   Eclipse 4 Basic Concepts

    How to create a Plug-in Project
    How to create a new Perspective using Extension Point
    How to add Perspective Shortcut or View Shortcut using extension point
    How to create a new View
    How to create Sticky View
    Adding functionality in Sample View - Show all projects in Sample View
    Adding Action in Menu or Toolbar of Sample View programmatically
    How to add Action and Menu in Eclipse Toolbar and Menu bar respectively
    How to hide or show action set in eclipse workbench when eclipse related part (like: Editor, View etc.) will be (de)activated
    How to enabled/disabled the View action depending on the File selection in View? How to open file in eclipse using View Action?
    How to create an Eclipse Extension Point and Implement in another Plug-in Project


Git Hub:

   How to use Git and Git Tutorial 


UML & Design Pattern:
   UML - Basic concepts
   Java Design Pattern

JNI (Java Native Interface):
  Basic of JNI with Eclipse 4 and Visual C++ in Windows


Thursday, March 29, 2012

How to create a Plug-in Project

  1. Open the “Plug-in Development” perspective.
  2. Go to File -> New -> Project… and then select “Plug-in Project” under “Plug-in Development” category from “New Project” wizard.
New Project wizard

  1. Click Next.
  2. Give the project name properly and keep other setting as it is (as of now).
Create New Plug-in Project wizard


  1. Click Next
  2. Keep all the setting as it is (as of now). Make sure that, under section “Rich Client Application” the radio button “No” is selected.

Plug-in project setting


  1. Click “Finish” to close the wizard. A new Plug-in project is created in eclipse workspace and it will be visible in “Package Explorer” view.
Created new plug-in Project


Wednesday, March 28, 2012

How to create a new Perspective using Extension Point

  1. Create a new Plug-in Project.
  2. Open “MANIFEST.MF” file from Plug-in project.
  3. Go to the “Extension” tab in the plug-in editor.
  4. Click “Add…” button. “New Extension” dialog box will be opened. Select “org.eclipse.ui.perspectives” from the list shown under “Extension Points” tab.

Add Extension Point in Plug-in project

  1. Click “Finish”.
  2. A new perspective extension is now created. Now provide the id*, name* and class* information accordingly.
Give id*, name* and class* information on perspective extension

  1. To create a class, click on the class*:  -> A “New Java Class” dialog box will be opened. Click “Finish” to create a new java class to the give package location.
Create class for perspective


  1. Save all unsaved files.
  2. To run the project, R-Click on the project -> Run As -> Eclipse Application.
Run Plug-in project

  1. A new instance of an Eclipse will be opened.
  2. Go to Window -> Open Perspective -> Other…
  3. “Open Perspective” dialog box will be opened. Select your perspective name from the list and click OK.
Open Perspective dialog box

  1. One blank perspective will be opened.
  2. Now close this test eclipse window and go back to the development eclipse window to modify this perspective.
  3. Open this newly created java class and modify it using the following code snippet:


  1. Run the project and see the effect of the code in newly launched test eclipse workbench.
"My Perspective" workbench

NB: If you don’t see the different in your perspective, just reset it using this following command.
Window -> Reset Perspective… -> Yes


Attachment: To Download this project click here.

Tuesday, March 27, 2012

How to add “Perspective Shortcut” or “ViewShortcut” using extension point

  1. Add new Extension Point – “org.eclipse.ui.perspectiveExtensions” in “plugin.xml” file under “Extensions” page.
New Perspective extension point dialog box

  1. Give the targetID* value. This value should be same as your new created perspective id. R-Click on this perspectiveExtension -> New -> viewShortcut
Add new "viewShortcut" under "perspectiveExtension" extension point


  1. Provide the id* value as “org.eclipse.ui.console.ConsoleView” to add shortcut of Console View in your perspective.
Add new view shortcut of Console view

  1. Add new “perspectiveShortcut” under “perspectiveExtension” and give any existing perspective id* value like: “org.eclipse.pde.ui.PDEPerspective” (Plug-in Perspective ID).
Add new perspective shortcut of "Plug-in Development"

  1. Run the project.
  2. Now you can found a new view shortcut of Console is added under “Window -> Show View” menu.
Console view shortcut menu

  1. Also found the new shortcut menu of Plug-in development perspective under “Window -> Open Perspective” menu.
Add new menu shortcut of "Plug-in Development" perspective

Attachment: To Download this project click here.

Monday, March 26, 2012

How to create a new View

  1. Add “org.eclipse.core.resources” in “Dependencies” tab in plugin.xml file.
Add Dependencies

  1. Add new extension point “org.eclipse.ui.views” in “Extensions” tab.
  2. Right click on this extension point and select “New -> category”. Provide the details of id* and name* of this element.
Add new category for View

  1. Right click on “org.eclipse.ui.views” extension and select “New -> view”. A new View element will be created. Now provide the details of this element. Id*: should be unique. Give the view name in name* filed. Give the full qualified name of the class in class* filed. Provide the same category id in category: field.
  2. Optionally, you can add icon for this view by providing the relative name of an icon file in icon: field.  Add .gif or .png file in your icons folder (create a new folder called “icons” under the plug-in project) with file size 16X16.
Add new icon file in project

  1. Other field’s values can keep as it is (default values).
Add new View

  1. Click on “class*” to create a new class and click “Finish” (as of now keep all default settings).
Create a new class for View

  1. Now we created a blank view.
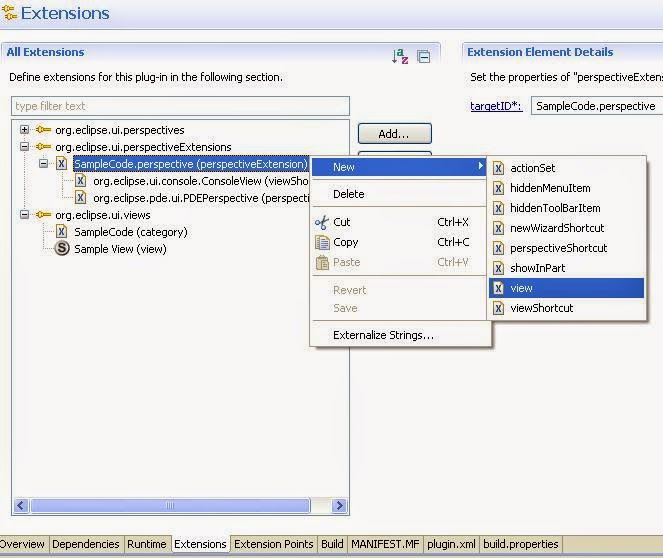
  2. To show this view in our own perspective, go to our own perspectiveExtension and right click on it and select “New -> view”.
Add new "view" under "perspectiveExtensions"

  1. Give the same id of your newly created view under “org.eclipse.ui.views” extension point into this id* field.
  2. The field “relationship*” field is for specify the relationship between id and relative. For put the your view as a stack relationship with “Project Explorer” view, put the value of relationship field as “stack” and relative: field should be the id of Project Explorer view id i.e. “org.eclipse.ui.navigator.ProjectExplorer”.
Note: To find the existing View ID, go to the IPageLayout.class file. For Editor Area, the ID of editor is “org.eclipse.ui.editorss”.
  1. Provide the ratio value as “0%” to “100%” w.r.t. editor area. For reference see this figure below:
Ratio calculation with respect to Editor Area

  1. Other parameter you can keep it default value.
Add existing "view" in perspective

  1. Now everything is done. Run the project and you can see this View in left side of an editor area in your perspective.
Show "My Perspective" with newly created "Sample View"

Attachment: To Download this project click here.

Additional Note:
To track the Error, modify the "SampleView.java" file using this following code:


package samplecode.source;

import org.eclipse.core.runtime.IStatus;
import org.eclipse.core.runtime.Status;
import org.eclipse.swt.SWT;
import org.eclipse.swt.widgets.Composite;
import org.eclipse.ui.part.ViewPart;

import samplecode.Activator;

public class SampleView extends ViewPart {

public SampleView() {
Activator
.getDefault()
.getLog()
.log(new Status(IStatus.ERROR, Activator.PLUGIN_ID, SWT.OK,
"Excaption occured.", null));
}

@Override
public void createPartControl(Composite parent) {
}

@Override
public void setFocus() {
}

}


Sunday, March 25, 2012

How to create Sticky View


What is Sticky View?
Sticky view is mostly applicable for other perspective. Is is act as a normal view in my perspective but act as a sticky for other perspective.

Requirement:
Dependencies: org.eclipse.core.resources
Extensions: org.eclipse.ui.views

[Note: Can be created for separate Category for this Sticky view also.]

1. Open the "plug.xml" file and go to the "Extensions" tab. R-click on "org.eclipse.ui.views" extension and select New -> stickyView option.
Popup menu of new add StickyView

 2. Provide id*and select location. According to the location selection, the sticky view will be shown in other perspective. The id* value should be same as already created view id like: SampleCode.view

3. Now run the eclipse application and open any perspective, you can see your View.

Attachment: To Download this project click here.

Saturday, March 24, 2012

Adding functionality in Sample View - Show all projects in Sample View


How to show all resources in view?
To show all projects and all files / folders in tree structure, IResourceChangeListener interface need to be implemented in View class.
How to add actions / menu in Sample View?
1. To add actions and menus in View, org.eclipse.ui.viewActions extension need to be added.
Add viewActions extension
2. After adding this extension, add new "viewContribution" with the unique id* value. The targetID* value should be same as Sample view id value.
Add "viewContribution" under viewActions extension.
3. Adding Menu item - To create a new menu item, R-click on viewContribution and select "menu" option like below screenshot.
Add "menu" in View
4. Provide the id* and label* for this menu item like below screen-shot.
Properties of Sample Menu item.
5. After succefully create the menu item, create new group under this menu. R-click on "menu" and select "groupMarker" option. Provide the group name like: sampleGroupMarker.
Add sampleGroupMarker
6. Create another menu item (Collapse Menu), and provide the value of id*, label* and path like below screenshot.
Add another "menu" item
7. Create another group for this collapse menu and provide the name for it like: collapseGroupmarker.
Add groupMarker under Collapse Menu item
8. Create an Action : To create a new "action", R-click on "viewContribution" and select "action". Provide the all properties like below screenshot.
Note: Need to add icons file for this action in /icons folder.
Add "action" under viewContribution extension.
id*: SampleCode.collapseAction
class*: samplecode.source.view.CollapseAllActionDelegate
menubarPath: SampleCode.sampleMenu/SampleCode.collapseMenu/collapseGroupmarker

9. click on the class* link and a "New Java Class" dialog box will be opened. Click on "Finish" button. Java class will be created.
Create new java class dialog box
10. Run the project, one action button will be shown in Sample View toolbar like below screenshot and also Menu will be created for this Collapse All action.
Sample View
11. Adding functionality on Sample View for display all the projects from workspace:
Dependencies: org.eclipse.ui.ide
Open the SampleView.java file and modify the file with this code snippet:

A. samplecode.source.SampleView.java


Create below mentioned three java files in samplecode.source.view package and modify these three files with the below mentioned code snippet.

B. samplecode.source.view.SampleContentProvider.java


C. samplecode.source.view.SampleLabelProvider.java


D. samplecode.source.view.SampleViewCellModifier.java


12 .Run the project and if any projects are in workspace, it will be visible in Sample View in Tree structure like below screenshot.
Sample View display workspace project(s)
Attachment: To Download this project click here

Friday, March 23, 2012

Adding Action in Menu or Toolbar of Sample View programmatically


1. To add Action in Menu, we need to create Action as well as Menu for this View. To do that, we need to modify the SampleView.java file. Open the SampleView.java file and add the given code in "createPartControl" method:


2. Then create these four private method in the same java file and modify it with the give below code.


3. Add two icon image files named as : " fields_co.gif " and " alphab_sort_co.gif " in "icons" folder.
Project folder structure with icon files.
Add three data members in this SampleView class:
private Action filterAction;
private SampleFilter vFilter;
private Action sortAction;

4.  Create a new Java class named as "SampleFilter" in "samplecode.source.view" package folder with extends "org.eclipse.jface.viewers.ViewerFilter" super class.
Create new Java class dialog box
Click Finish.

5. Modify this java file with the following below code snippet:


6. Create another java class named as "SampleViwerSorter" within "samplecode.source.view" package and extends "org.eclipse.jface.viewers.ViewerSorter" super class.
 Create new Java class dialog box for SampleViewSorter
Click Finish.

7. Modify this class with the following code snippet:


8. Modify the constructor of the SampleView class with below given code snippet:


9. Run the project and see the effect of the newly created two buttons in view toolbar.
Sample View
- Filter button filtering the all files.
- Sort button sorting all folders in alphabetical order.

Attachment: To Download this project click here.

Thursday, March 22, 2012

How to add Action and Menu in Eclipse Toolbar and Menu bar respectively


To add Action and Menu in eclipse workbench toolbar and menu bar, do the following:

1. Add new "Extension" in Extensions tab of plugin.xml file - org.eclipse.ui.actionSets

Adding "actionSets" extension point
2. Create new "actionSet" and provide the id*, label* and set visible to "true".

New"actionSets" properties
3. Right click on "actionSet" and select New -> menu option.

Add new "menu" option
Provide the value of id*, label* as give in the below screenshot.

Field of "path" value is depend on the developer. It may you keep it as blank. If it is blank, then newly created menu will be appeared at the end of the eclipse menu bar. If you want to keep your menu after specific eclipse standard menu item (like: File, Edit, Search, Window, Help etc.) then you have to provide their id in the "path" field. Like below screenshot, I provide "path" value as "run" which means, Sample Code Menu will be appear after "Run" menu.

"menu" properties
4. R-click on "menu" item and select New -> "groupMarker" option. Provide the name* as SampleCode.groupMarker

5. R-click on "actionSet" and create another "menu" item. Provide the id*, label*, path and icon value like below screenshot. "path" value should be [id of the menu item]/[group marker name]

Sample Menu properties
6. R-click on "actionSet" and select New -> action option.

Add new action option
7. After creating a new 'action" provide the respective properties of action like below screenshot.

"action" properties
Provide unique id*, label*, menubarPath (same as Show Menu View menu path value), toolbarPath (like: additions), icon and other properties keep as default.

8. Now, click on class link of this action properties, a New Java Class wizard will be opened. Provide the necessary data like below screenshot and click "Finish" button.

New Java Class wizard for creating new action class
A new java class will be created in "samplecode.source.action" package with default implementation of "IWorkbenchWindowActionDelegate" interface.
Modify the class using the below code snippet.


9. Save all the projects and run the project.

The new Menu will be created as well as a new action in toolbar. If this action is clicked, the Sample View will be visible in the current perspective.


Run the application. Output is highlighted.
10. If we provide this action as "toggle" style and modify this action class with below code snippet, then we can  apply this action as show or hide the Sample View in the current perspective.


And, change the action style property as "toggle" like below screenshot:


Action style property
11. If we run the current project, this action button now work as show/hide the Sample View in the current perspective.


Output window with toggle action button implementation
Now the button will be in toggle mode. If it is checked state, the Sample View will be visible or else it will be hidden.

Attachment: To Download this project click here.