- Add “org.eclipse.core.resources” in “Dependencies” tab in plugin.xml file.
 |
| Add Dependencies |
- Add new extension point “org.eclipse.ui.views” in “Extensions” tab.
- Right click on this extension point and select “New -> category”. Provide the details of id* and name* of this element.
 |
| Add new category for View |
- Right click on “org.eclipse.ui.views” extension and select “New -> view”. A new View element will be created. Now provide the details of this element. Id*: should be unique. Give the view name in name* filed. Give the full qualified name of the class in class* filed. Provide the same category id in category: field.
- Optionally, you can add icon for this view by providing the relative name of an icon file in icon: field. Add .gif or .png file in your icons folder (create a new folder called “icons” under the plug-in project) with file size 16X16.
 |
| Add new icon file in project |
- Other field’s values can keep as it is (default values).
 |
| Add new View |
- Click on “class*” to create a new class and click “Finish” (as of now keep all default settings).
 |
| Create a new class for View |
- Now we created a blank view.
- To show this view in our own perspective, go to our own perspectiveExtension and right click on it and select “New -> view”.
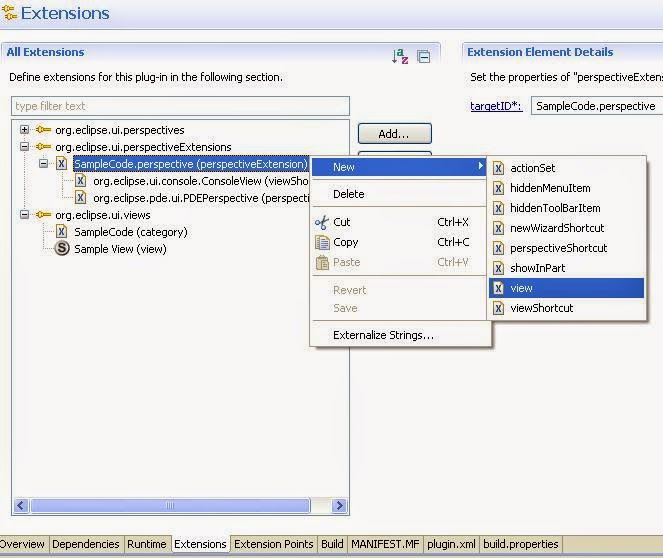 |
| Add new "view" under "perspectiveExtensions" |
- Give the same id of your newly created view under “org.eclipse.ui.views” extension point into this id* field.
- The field “relationship*” field is for specify the relationship between id and relative. For put the your view as a stack relationship with “Project Explorer” view, put the value of relationship field as “stack” and relative: field should be the id of Project Explorer view id i.e. “org.eclipse.ui.navigator.ProjectExplorer”.
Note: To find the existing
View ID, go to the IPageLayout.class file. For Editor Area, the ID of editor is
“org.eclipse.ui.editorss”.
- Provide the ratio value as “0%” to “100%” w.r.t. editor area. For reference see this figure below:
 |
| Ratio calculation with respect to Editor Area |
- Other parameter you can keep it default value.
 |
| Add existing "view" in perspective |
- Now everything is done. Run the project and you can see this View in left side of an editor area in your perspective.
 |
| Show "My Perspective" with newly created "Sample View" |
Attachment: To Download this project click here.
Additional Note:
To track the Error, modify the "SampleView.java" file using this following code:
package samplecode.source;
import org.eclipse.core.runtime.Status;
import org.eclipse.swt.SWT;
import org.eclipse.swt.widgets.Composite;
import org.eclipse.ui.part.ViewPart;
import samplecode.Activator;
public class SampleView extends ViewPart {
public SampleView() {
Activator
.getDefault()
.getLog()
.log(new Status(IStatus.ERROR, Activator.PLUGIN_ID, SWT.OK,
"Excaption occured.", null));
}
@Override
public void createPartControl(Composite parent) {
}
@Override
public void setFocus() {
}
}
No comments:
Post a Comment