Basic Tutorials on JNI :
How to write Java and CPP code in Eclipse 4 IDE for JNI Development?
Prerequisite
Before start write down CPP or Java code in Eclipse 4, first
need to setup the environment for develop JNI code.
1.
To write C/C++ code in Eclipse IDE, first need
to download CDT plugins. Download CDT from this below link: https://eclipse.org/cdt/downloads.php
2.
To develop Java code in Eclipse IDE, needs basic
JDT plugins which normally already included in Classic Eclipse IDE package.
3.
If you run the Eclipse 4 IDE in Windows system,
then recommend to install Microsoft
Visual C++ 2010 or later version
(or Express version) in your system. After installation of this product, please
verify that, below two products is installed properly:
A.
Microsoft
SDK: C:\Program Files\Microsoft SDKs\Windows\vX.XX
B.
Microsoft
Visual C++: C:\Program Files\Microsoft Visual Studio XX.X\VC
Note: MinGW or
Cygwin is another option to write C/C++ code in Windows system, but for JNI
development, the output dynamic library file will be generated as *.so file
using MinGW/Cygwin, not *.dll file. As a result, not able to load the *.so
dynamic file in Windows OS as *.so file only able to load Linux environment.
For Linux system default C++ compiler (GCC Package) will
working fine.
4.
For compile Java code and generate header file
from *.java file, requires JDK bundle should be installed in system with proper
System environment variables.
Writing Java Code:
Open the Eclipse 4 IDE and to write a Java code follow the
below steps:
1.
Create a new Java Project and provide the any
Java project name and click Finish.
 |
| Create Java Project |
2.
Create a new executable Main java class.
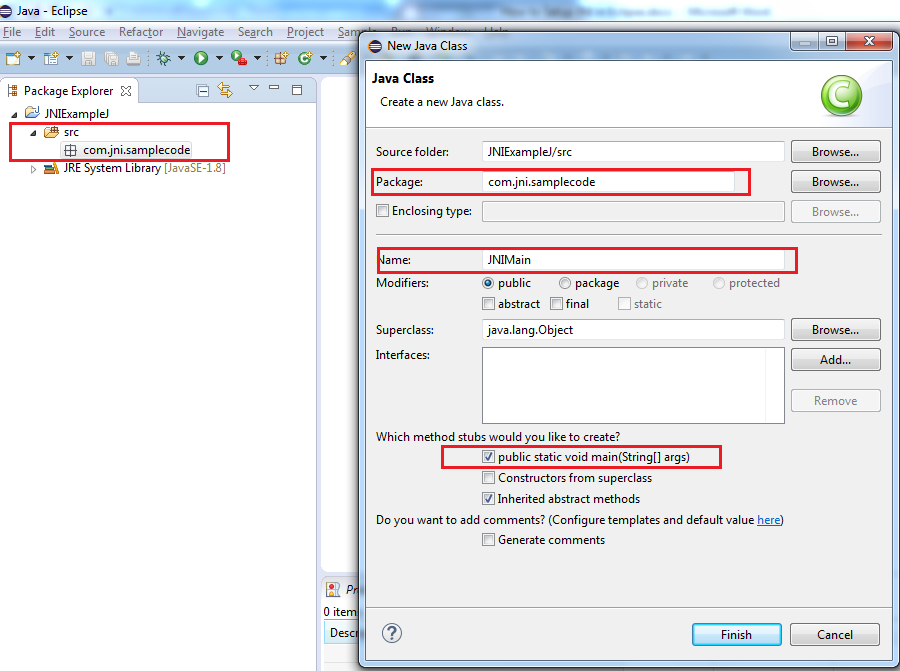 |
| Create Java class file |
3.
Write a simple Java code like below:
package com.jni.samplecode;
public class JNIMain {
/*static{
System.loadLibrary("");
}*/
public static void main(String[] args) throws Exception {
System.out.println("This is main
method from Java");
JNIMain
main = new JNIMain();
int returnCode = main.sayHello("Deb");
if(returnCode != 0) {
throw new Exception("Exception in
CPP code.");
}
}
public native int sayHello(String name);
}
4.
In Java code, there is one “native” method is
declared and call this method from “main” method. The output of this native
method will be coming from CPP program. Note that, static block is currently
commented. After getting the dynamic library file, this section will be updated
later.
Generate Header file from compiled Java file
1.
Open the Command Prompt and navigate to the
Project/src folder like:
C:\...\JNIExampleJ\src >
2.
Now give the following command to generate
header file for CPP project.
JNIExampleJ\src > javah com.jni.samplecode.JNIMain
3.
Here, javah command generate header file. This
command takes fully qualified class name as an argument. After successfully
executed this command, the header file will be generated is same src folder.
Like below screenshot:
 |
| Header File created |
4.
If you open this header file, you will find one
API is generated like below:
JNIEXPORT jint JNICALL Java_com_jni_samplecode_JNIMain_sayHello
(JNIEnv *, jobject, jstring);
5.
Here, jstring
take String as an argument from Java API and finally return int value as a jinit.
Write CPP Code:
1.
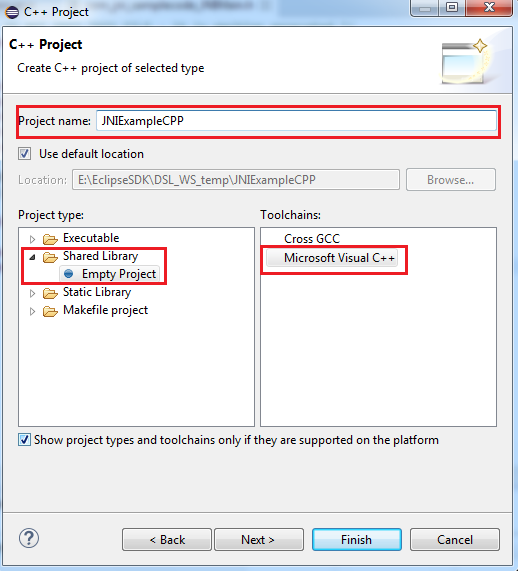
Create a new C++ project in Eclipse. Select C++ Project and click Next.
 |
| C++ Project Wizard creation |
2.
Provide CPP project name, select “Empty Project”
under Shared Library section and
right side select Microsoft Visual C++
toolchain. Click Next.
Note: If Microsoft Visual C++ toolchain is not visible in Toolchains
section, then please check and re-install the Microsoft Visual C++ and restart
the Eclipse IDE.
 |
| C++ Project selection type |
3.
Next will open project configuration page.
 |
| C++ Project wizard: Platform and Configuration selection |
4.
Select “Advance settings…” -> Select “C/C++
Build -> Environment -> Choose Configuration either Debug or Release mode
-> In LIB variable make sure that, both from Visual C++ as well as Windows
SDK Lib folders are included. If not included already, select LIB -> Edit…
button -> Add all Lib folder separated by “;” (semi-colon) -> OK
 |
| C++ Project Environment: LIB Parameter setting |
The two parameters for LIB arguments are
(Specify the proper version instead of XX):
A.
Microsoft
SDK: C:\Program Files\Microsoft SDKs\Windows\vX.XX\Lib
B.
Microsoft
Visual C++: C:\Program Files\Microsoft Visual Studio XX.X\VC\lib
5.
Click Finish.
6.
The CPP project will be created in CDT
Perspective. Make sure that, proper INCLUDE folder is added in CPP project.
 |
| INCLUDE folder added in C++ Project |
7.
Create “header” and “source” folder under this
CPP project for better manage this project.
 |
| header and source folder created under CPP Project |
8.
Copy generated *.h file from < Java_Project >/src folder to < CPP_Project >/header folder.
9.
Copy “jni.h” header file from this installation
folder to header folder:
C:\Program
Files\Java\jdk1.X.0_XX\include
10.
Copy “jni_md.h” header file from this
installation folder to header folder:
C:\Program
Files\Java\jdk1.X.0_XX\include\winXX
11.
Create a new CPP source file in “source” folder.
(Please create a *.cpp file instead of *.c file, else a lots of compilation
issue will be raised from Visual C++ Compiler.
 |
| CPP file creation wizard |
12.
The Project Explorer now looks like this:
 |
| CPP file created. Header files added. |
13.
Now write a CPP code like below:
/*
* SayHello.cpp
*
*
Created on: Jun 12, 2015
*
Author: DEBABRATA
*/
#include <iostream>
#include <string.h>
#include "..\header\com_jni_samplecode_JNIMain.h"
//class for: Convert jstring
to char*
class ConvertStringHelper {
public:
ConvertStringHelper(JNIEnv *env, jstring value) {
m_str = env->GetStringUTFChars(value,
0);
m_value = &value;
m_env = env;
}
~ConvertStringHelper()
{
m_env->ReleaseStringUTFChars(*m_value, m_str);
}
jstring* m_value;
const char *m_str;
JNIEnv *m_env;
};
JNIEXPORT jint JNICALL Java_com_jni_samplecode_JNIMain_sayHello(JNIEnv *env,
jobject obj, jstring str) {
printf("This is from
CPP Codeline.\n");
printf("Hello :
");
// Convert jtring
to char*
ConvertStringHelper helper(env, str);
const char* nativeStr = helper.m_str;
printf("%s", nativeStr);
return 0;
}
14.
Now for Build this CPP Project, Select CPP
Project -> Project -> Build Project.
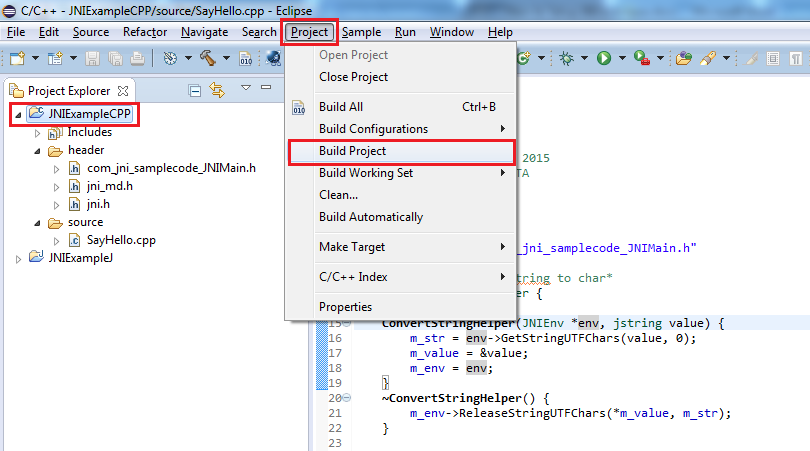 |
| Build CPP Project |
15.
After successful build the Console and Project
Explorer looks like below screenshot.
 |
| CPP Project Build output in Console |
Finally JNI Execution (CPP Code) from Java Code
1.
After successful build of CPP project, the *.dll
file will be generated under < CPP_Project >\Debug
or < CPP_Project >\Release
folder depending on the Build Configuration.
2.
Copy the *.dll file from respective folder from < CPP_Project > and paste it to < Java_Project > root folder.
 |
| DLL File location in Java and CPP Projects |
3.
Modify the JNIMain.java file with update the
dynamic library file name.
static{
System.loadLibrary("JNIExampleCPP");
}
4.
Done.
5.
Run the Java code and analyze the output of this
java program in Eclipse console.
 |
| Final output of the Java Programme in Console |
Note: To download this JNI project, please click here.
To download the source code from Github click here.
Troubleshooting
1.
Problem: Error in Console during compile and linking the object
file:
LNK1104: cannot open
file 'kernel32.lib'
Solution: Microsoft
SDK: C:\Program Files\Microsoft SDKs\Windows\vX.XX\Lib
-
This LIB variable is not set in CPP Project properties
or Microsoft SDK is not installed in system.
No comments:
Post a Comment