Prerequisite
2.
Download PuTTYgen from this location: http://www.chiark.greenend.org.uk/~sgtatham/putty/download.html
Or,
3.
Download and install Tortoisegit from this
location: https://code.google.com/p/tortoisegit/wiki/Download
Or,
Direct Link (32 bit): http://download.tortoisegit.org/tgit/1.8.9.0/TortoiseGit-1.8.9.0-32bit.msi
Direct Link (64 Bit): http://download.tortoisegit.org/tgit/1.8.9.0/TortoiseGit-1.8.9.0-64bit.msi
How to setup the local system for working with GitHub
First create an account in GitHub site. Go to this URL: https://github.com/ and follow some instruction
to create a new account. Finally Sign In to the site.
PuTTYgen
1.
Open the PuTTYgen file for generate the Key for
the repository on Github.
 |
| PuTTY Key Generator |
1.
Click on the Generate button to create the key.
During key generation, please move the mouse pointer on the free space area
randomly.
 |
| PuTTY KeyGen is generating Key |
1.
After finish the progress bar, the key will be
generated.
2.
You can save the public key and private key in
text file as well by click on respective “Save public key” and “Save private
key” button.
 |
| PuTTY Key is generated |
1.
Keep this window open, because after creating a new
repository in Github, this public key (which is highlighted on top Textbox) is
required.
GitHub
2.
Login with your username and password.
4.
Click on “Create your first repository” link or
click on “+ New repository” button on bottom right side of the home page.
 |
| New Repository in GitHub |
1.
New repository creation page will be opened.
2.
Provide the Repository Name, which will be like : [username]/[repo name]
3.
Provide the description of this repository.
4.
Keep it default “Public” repository, or mark as
“Private” if you want this repository as a PRIVATE. But recommendation is: keep
it Public.
5.
May check the README file option. And also, add
.gitignore and license option.
6.
Finally click on “Create repository” button to
create it.
 |
| Create new Repository |
GitHub Repository Settings
1.
Open the newly created Repository, go to the
Github location,
2.
Go to “Settings” option (Right side menu)
 |
| Repository Setting |
1.
To add others user who you want to access to
modify the files in this repository, go to “Collaborators” option (on the left
side menu) à
Add the username (existing Github user) à
Add collaborator. Done.
GitHub account settings
1.
For change the Github settings, go to the
Account settings (Top right side icon).
| Setting in Toolbar (GitHub) |
1.
Go to “SSH keys” menu (on the left side)
2.
Click on “Add SSH key” button for adding the
public key or private key.
3.
Provide the Title like: “Public Key”
4.
Copy the public key text from the already opened
PuTTYgen window and paste it inside the “Key” textbox.
5.
Add Key.
6.
Done. Your public key is now added.
Git setting in Eclipse
1.
Open Eclipse with “Git” perspective.
2.
Go to the “Git Repositories” View and click on
“Clone a Git repository” link.
 |
| Git Repositories in Eclipse View |
1.
Clone Git Repository wizard will be opened.
3.
Provide the User and Password.
4.
Keeps other options as default.
5.
Click “Next”. It will fetch the “master” branch
and will show on list.
 |
| Clone Git Repository in Eclipse |
1.
Click on “Next”.
2.
Provide the physical drive path location in
local where git repository will be store. Provide the “Remote name” as your choice.
Default keeps it as “origin”. Check other options as well.
3.
Finally click on “Finish” to create the clone
git in Eclipse.
 |
| Git Repositories in View |
Eclipse – Create Sample project
Create a sample any project which you want to push (commit
to GitHub repository site) to remote repository.
Git Bash – Commit new files and folder to GitHub
Go to the project parent folder location.
R-click on the parent folder and select “Git Bash” option from the pop-up menu.
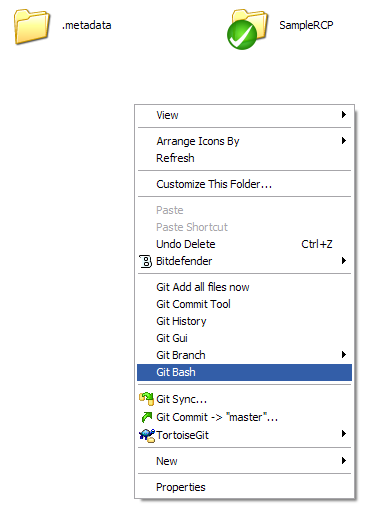 |
| Git Bash Shell in Windows Browser |
1.
To Configure the GIT with username and email do the
following command:
$
git config --global user.name "user name"
$
git config --global user.email username@projectdev.com
2.
For proxy setting:
$
git config --global http.proxy [hostname]:[port]
3.
To add all the folder information to the .git folder, give the following git
command on it. (in [master] current branch only)
$
git init
4.
To check the status of the project folder w.r.t.
GitHub, give the following command:
$
git status
5.
For add the all folders and files to the Git
version control, give the following command on the parent directory (either
specify the directory or add all directory/files).
$
git add [project_folder_name]
Or,
$
git add .
6.
Now commit all the codes to the local git
repository, give the following command:
$
git commit –am “description”
7.
Now we have to add the remote repository path
location to this bash shell
$
git remote add [repo_short_name] [repo_url]
8.
Now before push the code to remote repository,
first need to update the local repository with remote repository (sync with
remote repo), do the command:
$
git pull [repo_short_name] [master_or_branchName]
9.
Now push the code to remote repository, simply
execute this command:
$
git push [repo_short_name] [master_or_branchName]
Provide the username and password during
push the code.
10.
Now check the code on GitHub site. Done.
Other Git commands:
1.
Commit any specific folder to GitHub:
$
git commit [folder_name_with_relative_path]/ -m “commit description”
2. Fetch the code from other user's Pull Request: (two steps required)
$ git checkout [remote_repo_url]/pull/[pull_number_to_fetch]
$ git fetch [github_username] pull/[pull_number_to_fetch]/head:TESTPR
Git Book: http://git-scm.com/book
Git Hub Link: https://github.com
GitHub Help : https://help.github.com/categories/24/articles
2. Fetch the code from other user's Pull Request: (two steps required)
$ git checkout [remote_repo_url]/pull/[pull_number_to_fetch]
$ git fetch [github_username] pull/[pull_number_to_fetch]/head:TESTPR
External Reference:
Git Hub Link: https://github.com
GitHub Help : https://help.github.com/categories/24/articles
No comments:
Post a Comment